Page 142 - Contributed Paper Session (CPS) - Volume 1
P. 142
CPS1201 M. Iftakhar Alam et al.
                       0.0   -  -   81.3   12.4   -  -   0.813   -  -   17.3   1.733   -  -   13.300   618.8   35.7
                                                                                      38.2
                       0.2
                                             0.788
                                    16.5
                                78.8
                                                                               642.5
                                                            2.038
                                                                      16.691
                                                       16.8
                    5   0.4   -   76.7   20.7   -   0.767   -   16.7   2.392   -   20.820   659.2   39.5
                       0.6   -  -   62.9   32.3   -  -   0.629   -  -   16.1   3.170   -  -   32.371   671.5   41.7
                                             0.533
                       0.8
                                                                               660.1
                                                                      39.342
                                                            4.175
                                    39.3
                                53.3
                                                                                      42.0
                                                       15.7
                      1.0   -   100.0   0.0   -   1.000   -   17.5   3.008   -   0.0   591.1   33.8
                            -   99.9   0.0   -   0.999   -   20.0   -   -   0.015   -   -
                      b(πˆ )   -   99.5   0.5   -   0.995   -   1.8   0.087   -   0.251   14.8   8.2
                       0.0
                      0.2   -   99.8   0.2   -   0.998   -   1.8   0.090   -   0.142   13.9   7.7
                    6   0.4   -   99.7   0.3   -   0.997   -   1.8   0.100   -   0.137   19.1   10.5
                       0.6   -   99.4   0.6   -   0.994   -   1.8   0.105   -   0.317   17.3   9.4
                       0.8   -   99.7   0.3   -   0.997   -   1.8   0.093   -   0.212   18.9   10.3
                       1.0   -   99.7   0.3   -   0.997   -   1.8   0.103   -   0.115   13.0   7.3
                      b(πˆ )   -   93.5   6.5   -   0.935   -   20.0   -   -   2.054   -   -


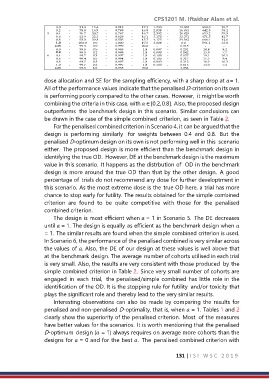
                  dose allocation and SE for the sampling efficiency, with a sharp drop at = 1.
                  All of the performance values indicate that the penalised D-criterion on its own
                  is performing poorly compared to the other cases. However,  it might be worth
                  combining the criteria in this case, with  ∈ [0.2, 0.8]. Also, the proposed design
                  outperforms  the benchmark design in this scenario.  Similar conclusions can
                  be drawn in the case of the simple combined criterion, as seen in Table 2.
                      For the penalised combined criterion in Scenario 4, it can be argued that the
                  design  is  performing  similarly  for  weights  between  0.4  and  0.8.  But  the
                  penalised D-optimum design on its own is not performing well in this  scenario
                  either.  The proposed design is more efficient than the benchmark design in
                  identifying the true OD.  However, DE at the benchmark design is the maximum
                  value in this scenario.  It happens as the distrbution of  OD in the benchmark
                  design is more around the true OD than that by the other design.  A good
                  percentage of  trials do not recommend any dose for further developtment in
                  this scenario. As the most extreme dose is the true OD here, a trial has more
                  chance to stop early for futility. The results obtained for the simple combined
                  criterion  are  found  to  be  quite  competitive  with  those  for  the  penalised
                  combined criterion.
                      The design is most efficient when  = 1 in Scenario 5.  The DE decreases
                  until  = 1. The design is equally as efficient as the benchmark design when
                  = 1. The similar results are found when the simple combined criterion is used.
                  In Scenario 6, the performance of the penalised combined is very similar across
                  the values of . Also, the DE of our design at these values is well above that
                  at the benchmark design. The average  number of cohorts utilised in each trial
                  is very small. Also, the results are very consistent with those produced  by the
                  simple combined criterion in Table 2.  Since very small number of cohorts are
                  engaged  in  each  trial,  the penalised/simple combined has little role in the
                  identification of the OD. It is the stopping rule for futility  and/or toxicity that
                  plays the significant role and thereby lead to the very similar results.
                      Interesting observations can also be made by comparing the results for
                  penalised and non-penalised D-optimality, that is, when  = 1. Tables 1 and 2
                  clearly show the superiority of the penalised criterion.  Most  of the measures
                  have better values for the scenarios.  It is worth mentioning that the penalised
                  D-optimum  design ( = 1) always requires on average more cohorts than the
                  designs for  = 0 and for the best .  The  penalised combined criterion with


                                                                     131 | I S I   W S C   2 0 1 9

